SBOM Tracking
This flow covers generating a Software Bill of Materials from an edge build, uploading it to the Cybersecurity module, triaging vulnerability findings, and producing a security report.
Involves: Edge Security, Cybersecurity, Embedded Manager, PMS
Step 1 - Generate the SBOM
Every image build produced by meta-tolomeo automatically generates a CycloneDX SBOM and a VEX file at the end of the build:
artifacts/<machine>/<image>/<version>/cyclonedx/
├── bom.json     # CycloneDX 1.6 Software Bill of Materials
├── summary.json # Log of sbom and vex states
└── vex.json     # Vulnerability Exploitability eXchange
The meta-tolomeo layer pre-configures DAVE Embedded Systems as a supplier in the SBOM. If you are building on top with your own meta-layer, add your company's supplier information to ensure correct attribution:
# In your distro configuration
CDX_SUPPLIER_MAP[mycompany.name] = "My Company Name"
CDX_SUPPLIER_MAP[mycompany.urls] = "https://www.mycompany.com"

# Assign to your top-level recipes
CDX_COMPONENT_SUPPLIER = "mycompany"
Supplier assignment propagates automatically to dependencies. For more accurate kernel CVE
analysis, enable the kernel VEX pipeline in meta-tolomeo
so that CVEs are cross-referenced against the compiled source list at build time. The enriched
vex.json is then produced alongside bom.json with no further manual steps. See
Edge Security for the details.
Step 2 - Upload to Cybersecurity
There are two paths to get an SBOM into the Cybersecurity module.
Manual upload
In the Cybersecurity module, select the model using the Track version button write the
firmware version that you would like to track and upload bom.json.
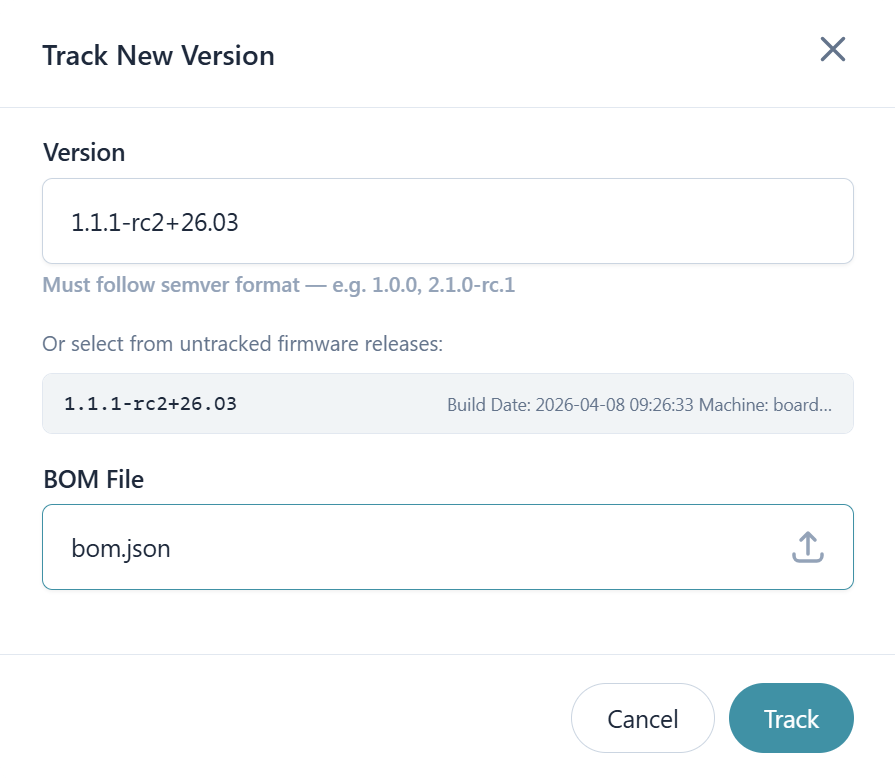
Once processing completes, the vulnerability views populate with CVE findings. Upload vex.json alongside the
SBOM to suppress known false positives and apply not-affected justifications at the component level.
This path works for any build produced by meta-tolomeo or by a custom meta-layer that inherits from it.
Via Embedded Manager
Work in progress
Embedded Manager SBOM tracking is under active development. Refer to the current state of the UI for what is live.
When a build is completed inside the Embedded Manager, its SBOM can be flagged for tracking in the Cybersecurity module directly from the build detail view. No file download or manual upload is required.
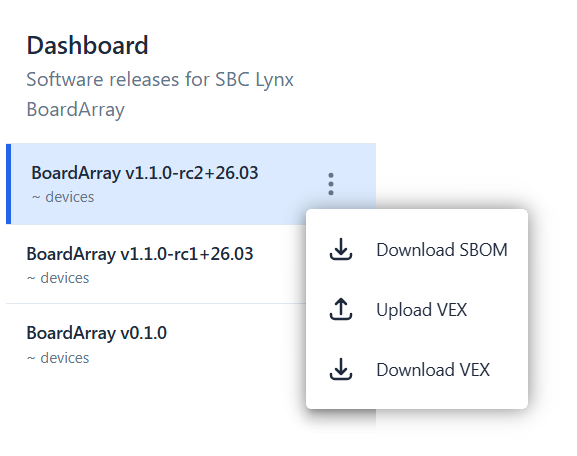
Step 3 - Review findings
Once the SBOM is processed, the Cybersecurity module provides several views for understanding the vulnerability landscape of the firmware version.
The Dashboard is the starting point. The overview tab shows a severity and triage state matrix for the selected firmware version, where each cell links directly to the filtered vulnerability list. The timeline tab shows the historical evolution of vulnerability counts by severity across tracked versions.
The Vulnerabilities and Triage tab lists all CVE findings with CVSS scores, severity, and EPSS. Findings can be filtered by CVE identifier, component name, severity, or triage state.
The Components tab lists every software component in the SBOM with its version, license, risk score, and a summary of affecting vulnerabilities.
The Analysis section provides two cross-version tools: Deep Dive for historical graphs on a single firmware version, and Compare Versions for side-by-side comparison of component changes and vulnerability metrics between two versions.
Step 4 - Triage
From the Vulnerabilities tab, open any finding to set an analysis state and justification. States map to standard VEX analysis states:
| State | Meaning |
|---|---|
| In triage | Received, not yet assessed |
| Not affected | The vulnerability exists in a component you ship but cannot be reached or exploited in your context |
| Exploitable | The vulnerability is reachable and poses a real risk |
| Resolved | A fix has been applied |
All triage changes are tracked permanently and attributed to the user who made them.
How to approach triage
Start with severity. Sort findings by CVSS score and work critical and high findings first. A high CVSS score means the vulnerability is severe in the general case, but it does not mean it is exploitable in your specific build. The score is a starting point for prioritization, not a verdict.
For each finding, ask whether the vulnerable code path is actually reachable on your device. Many CVEs in embedded firmware affect features that are not compiled in, not enabled, or not reachable from an attack surface that exists on the device. If that is the case, mark the finding as not affected and record the justification clearly: for example, "feature disabled at build time" or "no network interface exposed on this product". Precise justifications are worth the effort because they carry forward to future builds and prevent the same analysis being repeated.
For findings that are genuinely exploitable, record them as such and track remediation. The fix may mean updating a component, backporting a patch into a Yocto recipe, or accepting the risk with a documented rationale.
Step 5 - Generate a report
A security report is the formal record of the security posture of a firmware version at a given point in time. It is the artifact you share with customers, auditors, or management as evidence that vulnerability analysis has been performed. For this reason it should be generated after triage is complete, so that the report reflects the real risk picture rather than the raw count of unreviewed CVE matches.
From the Cybersec dashboard trigger report generation for the firmware version you want to document. Once ready it becomes available in the Reports section for download via a one-time URL. The report includes project metadata, the full component table with licenses and risk scores, and CVE findings with their CVSS scores and current triage states. Previously generated reports remain accessible for historical comparison.
Step 6 - Set up alarms
CVE databases are updated continuously. A component that had no known vulnerabilities when a firmware version shipped may acquire new CVE matches weeks or months later. Without alarms, catching these new findings requires manually re-checking every tracked version on a regular basis. Alarms make this proactive: the platform notifies the right people the moment a relevant event occurs, without any polling required.
Configure alarms in the Cybersecurity module for each model you are actively maintaining. The most critical alarm type is New vulnerability, which fires when a CVE is matched to a component in a tracked firmware version. It can be filtered by severity, CVSS, and EPSS so that only findings above your chosen threshold generate a notification.
Supported alert types:
| Alert type | Trigger |
|---|---|
| New vulnerability | A new CVE was matched to a component |
| Project audit change | An analysis state was changed |
| BOM processed | SBOM ingestion completed |
| VEX processed | VEX file was processed |
The Project audit change alarm is useful for teams where triage is shared across multiple people: every member stays informed when an analysis decision is recorded. Each alarm supports multiple subscribers, so the right engineers and stakeholders each receive notifications directly.